SSO统一身份认证——CAS Server6.3.x自定义验证逻辑尝试(六)
背景
单点登录(SingleSignOn,SSO),就是通过用户的一次性鉴别登录。当用户在身份认证服务器上登录一次以后,即可获得访问单点登录系统中其他关联系统和应用软件的权限,同时这种实现是不需要管理员对用户的登录状态或其他信息进行修改的,这意味着在多个应用系统中,用户只需一次登录就可以访问所有相互信任的应用系统。这种方式减少了由登录产生的时间消耗,辅助了用户管理,是目前比较流行的。
单点登录的使用场景有很多,C/S、B/S架构的系统均可使用,通常是支持快速配置使用。
业内目前实现SSO的方式有很多种,在ToC场景下互联网公司通常使用的是OAuth2协议,而ToB场景下大家通常是囊括百家,既支持OAuth2又支持CAS,还滴支持LDAP。其造成的原因主要是因为在ToB场景下需要对接SSO的系统通常仅支持某个协议,而这类系统又不是同一个协议导致。
而我当前境况下就是既有ToC场景又有ToB场景,在该种情况下,我开始对其业内的各种协议进行整合集成,这一系列文章将对其业内各个协议从基础到深入、从搭建到二次开发进行记录,同时将其整理出来分享给大家。
简介
CAS是Central Authentication Service的缩写,中央认证服务,一种独立开放指令协议。CAS 是 耶鲁大学(Yale University)发起的一个开源项目,旨在为 Web 应用系统提供一种可靠的单点登录方法,CAS 在 2004 年 12 月正式成为 JA-SIG 的一个项目。
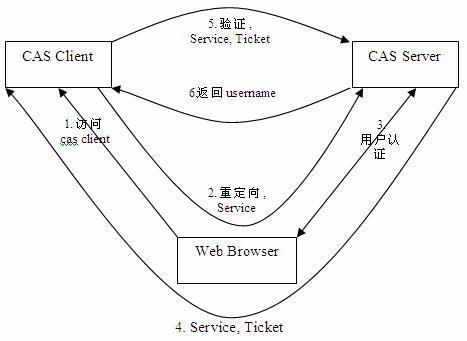
其主结构由CAS Server、CAS Client两部分组成。下图为官方提供的结构图,大家可以作为参考进行理解。

环境
主要使用的环境如下
服务器系统:windows 10
环境:OpenJDK 11
web中间件:tomcat9
CAS Server:6.3.x
数据库:MariaDB 或 PostgreSQL
正文
本节我们将对其验证逻辑进行重构,在日常产品开发时我们的认证通常不至于账号、密码两个参数进行核验,而是具有各种各样的参数进行效验,例如增加图形验证码、增加人机核验等等,本节我们先对于其账号密码逻辑进行重构,来实现自定义验证逻辑替换。
1、首先我们翻阅了官方文档,文中说明了我们可以构建一个自己的AuthenticationHandler,那我们先创建一个:
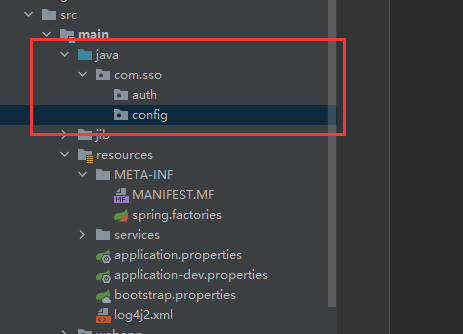
创建所需要的包路径。

在auth包中创建一个类MyAuthenticationHandler.java

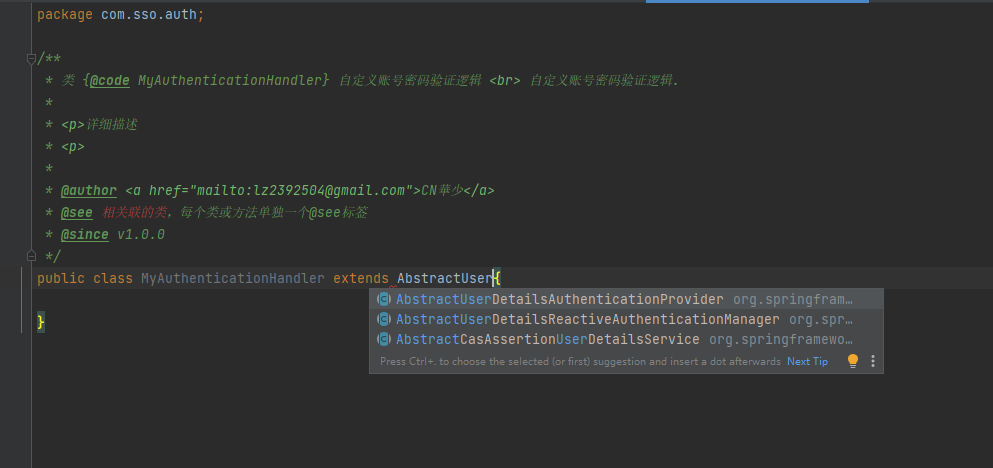
但是当我们按照官方文档进行继承AbstractUsernamePasswordAuthenticationHandler 类时就会发生图上的情况,IDEA自动检索引入的lib包中没有,这时为什么呢?其实我们的使用的包中该接口是在其他包中的,而我们默认加载过来的存在一定的缺失性,需要再次引入几个包。
打开根目录下的build.gradle文件,再次引入如下包:
    // CAS dependencies/modules may be listed here statically...
    implementation "org.apereo.cas:cas-server-webapp-init:${casServerVersion}"
    implementation "org.apereo.cas:cas-server-support-jdbc:${casServerVersion}"
    implementation "org.apereo.cas:cas-server-support-jdbc-drivers:${casServerVersion}"
    // implementation "org.postgresql:postgresql:42.2.23"
    // https://mvnrepository.com/artifact/org.mariadb.jdbc/mariadb-java-client
    implementation 'org.mariadb.jdbc:mariadb-java-client:2.7.3'


    // 新增的部分
    implementation "org.apereo.cas:cas-server-core-authentication-api:${casServerVersion}"
    implementation "org.apereo.cas:cas-server-core-configuration-api:${casServerVersion}"
    implementation "org.apereo.cas:cas-server-core-api-configuration-model:${casServerVersion}"
重新启动一下IDEA,使其自动检索并加载一下需要的jar包
再次进行尝试
发现可以看到了,果断选择,暂创建为如下类:
package com.sso.auth;

import lombok.Getter;
import lombok.Setter;
import lombok.extern.slf4j.Slf4j;
import org.apereo.cas.authentication.AuthenticationHandlerExecutionResult;
import org.apereo.cas.authentication.Credential;
import org.apereo.cas.authentication.PreventedException;
import org.apereo.cas.authentication.credential.UsernamePasswordCredential;
import org.apereo.cas.authentication.handler.support.AbstractUsernamePasswordAuthenticationHandler;
import org.apereo.cas.authentication.principal.PrincipalFactory;
import org.apereo.cas.services.ServicesManager;

import java.security.GeneralSecurityException;

/**
 * 类 {@code MyAuthenticationHandler} 自定义账号密码验证逻辑 <br> 自定义账号密码验证逻辑.
 *
 * <p>详细描述
 * <p>
 *
 * @author <a href="mailto:lz2392504@gmail.com">CN華少</a>
 * @see AbstractUsernamePasswordAuthenticationHandler
 * @see UsernamePasswordCredential
 * @since v1.0.0
 */
@Slf4j
@Setter
@Getter
public class MyAuthenticationHandler extends AbstractUsernamePasswordAuthenticationHandler {


    protected MyAuthenticationHandler(String name, ServicesManager servicesManager, PrincipalFactory principalFactory, Integer order) {
        super(name, servicesManager, principalFactory, order);
    }

    @Override
    protected AuthenticationHandlerExecutionResult authenticateUsernamePasswordInternal(UsernamePasswordCredential credential, String originalPassword) throws GeneralSecurityException, PreventedException {
        System.out.println("这是一个测试认证111");
        return null;
    }

    @Override
    public boolean preAuthenticate(Credential credential) {
        return super.preAuthenticate(credential);
    }

    @Override
    public AuthenticationHandlerExecutionResult postAuthenticate(Credential credential, AuthenticationHandlerExecutionResult result) {
        return super.postAuthenticate(credential, result);
    }
}
2、创建一个注册配置类
package com.sso.config;

import com.sso.auth.MyAuthenticationHandler;
import org.apereo.cas.authentication.AuthenticationEventExecutionPlan;
import org.apereo.cas.authentication.AuthenticationEventExecutionPlanConfigurer;
import org.apereo.cas.authentication.principal.DefaultPrincipalFactory;
import org.apereo.cas.configuration.CasConfigurationProperties;
import org.apereo.cas.services.ServicesManager;
import org.springframework.beans.factory.annotation.Autowired;
import org.springframework.beans.factory.annotation.Qualifier;
import org.springframework.boot.context.properties.EnableConfigurationProperties;
import org.springframework.context.annotation.Configuration;

/**
 * 类 {@code MyAuthenticationEventExecutionPlanConfiguration} 自定义CAS注册配置 <br> 自定义CAS注册配置.
 *
 * <p>详细描述
 * <p>
 *
 * @author <a href="mailto:lz2392504@gmail.com">CN華少</a>
 * @see CasConfigurationProperties
 * @see AuthenticationEventExecutionPlanConfigurer
 * @since v1.0.0
 */
@Configuration("MyAuthenticationEventExecutionPlanConfiguration")
@EnableConfigurationProperties(CasConfigurationProperties.class)
public class MyAuthenticationEventExecutionPlanConfiguration implements AuthenticationEventExecutionPlanConfigurer {

    @Autowired
    @Qualifier(value = "servicesManager")
    private ServicesManager servicesManager;

    @Override
    public void configureAuthenticationExecutionPlan(final AuthenticationEventExecutionPlan plan) {
        var myAuthenticationHandler = new MyAuthenticationHandler(MyAuthenticationHandler.class.getName(), servicesManager, new DefaultPrincipalFactory(), 1);
        plan.registerAuthenticationHandler(myAuthenticationHandler);
    }

    @Override
    public String getName() {
        return AuthenticationEventExecutionPlanConfigurer.super.getName();
    }

    @Override
    public int getOrder() {
        return AuthenticationEventExecutionPlanConfigurer.super.getOrder();
    }
}
3、在src\resources\META-INF\spring.factories文件中进行指定其注册配置类。
org.springframework.boot.autoconfigure.EnableAutoConfiguration=org.apereo.cas.config.CasThymeleafConfiguration
4、重新打包,进行启动测试。
再次尝试登录时观察控制台,发现打印了我们刚才的日志,说明其进入了我们的判定逻辑。

到此,我们就可以在MyAuthenticationHandler的authenticateUsernamePasswordInternal中编写我们的认证实现了。本节暂时到此,后续我们会对于自定义验证逻辑进行深入的编写,欢迎持续关注作者。
本文声明:

知识共享许可协议
本作品由 cn華少 采用 知识共享署名-非商业性使用 4.0 国际许可协议 进行许可。
